Pages

Showing posts with label craft activities. Show all posts

Wednesday, July 21, 2010

Craft for transportation party

As an ice-breaker activity, we made these cute little paper clay luggage tags for the kids to colour and decorate while waiting for their little friends to arrive.
Luggage tag craft These were the plain luggage tags. We painted in the outlines to make them easier for the kids. What's so great about using paper clay is that you can use colour pencils, crayons, magic markers or paint to colour on it. We gave the kids magic markers and colour pencils to avoid the mess :-)
Luggage tag craft These were some we painted using acrylic paint for the babies.

For customised party craft kits / activities, please contact funparties_kl@yahoo.com


Monday, August 10, 2009

Fun Pirate Project 4: Shiny Cutlass & Hook

This is the last project from our Fun Pirate Project Series. I'll get Aunty LE to try them out with the kids in her kindy, I'm suggesting she do a Pirate Week, that will be fun!

Ok, for the final project, we will make a cutlass and hook. This will be the highlight as I'm sure your kids (the little boys especially) will go nuts over these new toys!

What you need:
  • Cardboard
  • Glue
  • Kitchen aluminium foil
  • Brown paper
  • Shiny stickers
To make a cutlass:
    Pirate Cutlass template

  1. Using the template, trace the cutlass on a piece of large cardboard. You need to draw and cut out two cutlass shapes

  2. Spread glue on one side of each 'blade', and press onto a piece of kitchen foil. The blades need to face each other, and be careful not to stick the handles onto the foil

  3. Cut foil around the blades, leaving about 1/2" border. Then make slits around the border and bend the foil over to wrap around the blades.

  4. Spread glue around the edge of each blade and glue them both together

  5. Line up the edge of the handle with the edge of a piece of brown paper. Draw around it, then turn it over and draw around it again. Then cut out the shapes

  6. Glue the paper shapes onto the handle. Then decorate the handle with shiny stickers
To make a hook:
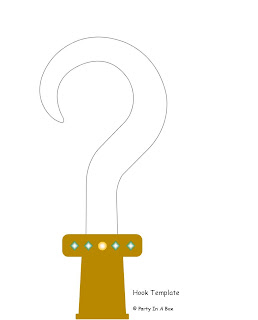
Pirate Hook template
  1. Using the template, trace the hook on a piece of large cardboard. You need to draw and cut out two hook shapes

  2. Follow steps 2-6 above

  3. Use a blunt pencil to draw watery swirls and leaf patterns on the blade

Tuesday, August 4, 2009

Fun Pirate Project 3: Money bag with silver coins

Treasure, treasure, treasure! Send you little pirates on a treasure hunt by hiding these DIY silver coins in your yard. They can then keep the coins they find in their little DIY money bag :-)

Silver coins
  1. Lay a 50 sen coin on a piece of thin cardboard and trace around it. You need 2 circles to make one coin. Cut out the circles

  2. Glue the circles onto a piece of aluminium foil on the non-shiny side. Cut around them, leaving a border, and fold the foil over the circles

  3. Using a blunt pencil, draw a picture in the middle of each circle (on the foil side), then glue 2 circles together to form a coin

* In keeping with the pirate theme, draw pirate related pictures on your coins, e.g. treasure chest, skull and crossbones, pirate ship, cutlass and hook, etc.


Money bag

You can let the kids make their own money bags during the party. It's a good ice-breaker activity, also a good way to keep the kids busy while waiting for their friends to arrive.


  1. Trace a large circle on a piece of felt and cut it out

  2. Punch a series of holes around the circumference of the circle, approximately one inch in from the side

  3. Thread a piece of elastic through the holes

  4. Pull the elastic tight to gather in the bag. Then tie a strong knot in the elastic, being careful to ensure that the elastic is loose enough for your little one to get the coins in and out, but tight enough to make sure that the contents won't spill out. Then tie the elastic onto a belt or wrist and cut off any loose ends

Images courtesy of Kids Craft Weekly


Monday, August 3, 2009

Fun Pirate Project 2: Eye Patch

Your little pirates also need their eyepatch to complete the look!

What you need:

  • Black colour felt or cardstock

  • Black elastic thread

Instructions:
  1. Draw a circle on the felt or cardstock big enough to cover one of your eyes, cut it out (you can use the template below)

  2. Optional: Make a cut in the middle, from the bottom right up to the center. We are going to create a bulge by overlapping one edge over the other. You can use glue or double sided tape to fix it

  3. Cut a piece of elastic thread that will go around your head

  4. Make 2 small holes, one on each side of your eyepatch. String the thread through the holes and secure it with a dead knot

  5. You may also decorate the eye patch by painting on a skull using white acrylic paint
Pirate eyepatch template

Tuesday, July 28, 2009

Fun Pirate Projects

Ahoy Matey! Take a leap into the swashbuckling world of pirates as we show you simple pirate projects you can do at home with your little ones. Not only will you jazz up your pirate party, we guarantee you and the kids heaps of fun!

Project 1: Pirate hat
Project 2: Eye patch
Project 3: Money bags with silver coins
Project 4: Shiny cutlass and hook

We will start with making a pirate hat. No pirate party is complete without dressing up your little buccaneers. To look the part, wear a red & white striped t-shirt with your hat :-)

Project 1: Pirate Hat


  1. Fold a large piece of black paper in half. Crease the fold well. Turn the paper so that the fold is at the top

  2. Bend the paper over so that the short edges meet. Gently squeeze the middle to make a mark, then open it out again

  3. Fold the top left hand corner down into the middle, then crease it flat. Then fold down the top right hand corner too

  4. Fold up the top layer of the bottom of the hat. Then turn the hat over and fold the other layer in the same way

  5. Cut a circle from white paper and draw a skull & crossed bones on it. The glue the circle onto the hat


Monday, July 27, 2009

Make your own Lion Pinata

Lion pinata

Having a pinata brightens up your party - not only does it add to the theme decoration, it is also a hit with children. We wanted a pinata for baby H's jungle party and decided to make one ourselves. It looks way harder than it really is but everyone can do it, even if you don't have crafty fingers.

What you need:
  • Balloon
  • Tapioca flour to make glue
  • Newspaper or magazines
  • Cardboard or used carton box
  • Orange and brown crepe paper
  • Double-sided tape
  • Paint
  • Ribbons
Instructions:
1. Making the lion head
  • Dissolve little tapioca floor in water and stir the mixture over low heat to form a glue paste
  • Inflate the balloon and prop it up using a container / bowl
  • Tear newspaper or magazines into 1 - 1.5 inch strips
  • Smear glue onto newspaper strips and paste them on the balloon. Cover the whole balloon except for a tiny opening at the bottom. Make sure you overlap the strips, and have enough layers to form a strong shell (2 layers at a time to allow ease of drying, 6-8 layers minimum)
  • Once the paper mache lion head's complete, allow it to dry completely
  • Use a piece of cardboard or old carton box to draw on a pair of ears for the lion (you can draw a circle and cut it in half). Cut them out and stick them on the lion head using double sided tape
2. Decorating the lion head
  • Paint the lion head and ears orange
  • Cut the orange crepe paper into squares, and stick them onto the lion head and ears, covering every part
  • Next, cut the brown crepe paper into 1 inch wide strips. Fold each strips by looping them (like making a fan) and staple the ends together to hold the loops. Use double sided tape to stick them on the lion head to form its mane
  • Finally, draw a set of eyes and mouth on the cardboard, cut them out and stick them onto the lion's face using double sided tape
3. Making the hanger and latch
  • Prick a hole at the top of the lion head, string a piece of ribbon or yarn through the hole and knot it to form the hanger
  • Using the cardboard, draw a circle (the same size as the opening at the bottom of your pinata), and four rectangles touching the side of the circle (top, bottom, left and right). This will form the latch for your pinata.
  • Cut out the latch, paint it orange, and stick on the remaining orange crepe paper squares
  • Make a hole in the middle of the latch, string the ribbons through the hole and make a knot to secure the ribbons
  • To cover the pinata, fold the rectangles inwards and push the latch through the hole. You can use masking tape or cellophane tape to secure the latch if required
Fill your pinata with candies and little goodies and let the fun begin! We thought it would be rather nasty to have the kids bash up the lion, hence the pull string pinata. As most of the kids are rather young, we let them pull the pinata together. But you can always make it into a game. Some people make multiple holes on the latch for the ribbons. Most are loosely stringed except for 1-2, which are knotted. Each child gets a turn to pull a ribbon, the lucky child wins and shares the goodies with his friends :-)

Thursday, July 23, 2009

DIY Favour Bags


Plastic loot bags just aren't our cup of tea. For baby H's first birthday, we made these cute little favour bags out of brown luncheon bags (you can get them in most convenient stores). All you need are:


  • A hole puncher


  • Yarn, strings or ribbons


  • Animal pictures (we cut them out from an animal gift wrap)


  • Glue


Fold the top of the luncheon bag in and punch holes for the handles. Tie the handles on, and glue on the picture. Ta-da! You now have a cute little favour bag that not only matches the jungle theme but is also environmentally friendly :-)
This is what we gave out to our little guests - a little stuff jungle animal in our little DIY favour bag.